Soft, cake-like apple cookies filled with raisins and walnuts and finished with a sweet vanilla glaze. The perfect homemade cookie for fall!
If you’re looking for a cozy fall cookie that’s a little different from the usual pumpkin recipes, these Glazed Apple Cookies are just the thing! They’re soft, tender, and packed with little bites of fresh apple, plump raisins, and crunchy walnuts.
And then there’s that glaze! A simple vanilla glaze drizzled over the warm cookies adds just the right amount of sweetness.
AN EASY APPLE COOKIE FOR FALL
Fall is my absolute favorite time of year. There’s just something about the cool, crisp air, colorful leaves, fall festivals, and all those wonderful apple recipes that makes this season extra special.
These Glazed Apple Cookies originally came from The Harvest Table cookbook from Gooseberry Patch. When I first made them, I knew they were going to be a keeper.
These aren’t your typical crisp or chewy cookies. They’re more like little apple cake cookies—soft, fluffy, and full of fall flavor.
The combination of fresh chopped apples, raisins, brown sugar, and walnuts makes every bite delicious. Drizzle that sweet vanilla glaze over the top while the cookies are still warm, and you have one seriously irresistible fall treat.
They’re wonderful with a hot cup of coffee or apple cider, and they’re also perfect for sharing with friends and family.
FREQUENTLY ASKED QUESTIONS
What kind of apples are best for Glazed Apple Cookies?
You can use just about any good baking apple. Granny Smith apples are great if you like a little tartness, while Honeycrisp, Gala, or Fuji apples will give the cookies a sweeter apple flavor.
Do I need to peel the apples?
Yes. For the best texture, peel and core the apple before chopping it into small pieces. Finely chopped apples will distribute more evenly throughout the cookie dough.
Why do you soak the raisins?
Soaking the raisins in hot water helps plump them up so they stay soft and juicy while the cookies bake.
Can I leave out the walnuts?
Absolutely! If you don't care for nuts, simply leave them out. You could also substitute pecans if that's what you have on hand.
Why should I make these cookies small?
These cookies have a soft, cake-like texture. Keeping them on the smaller side helps them hold together better and makes them easier to eat.
How should I store Glazed Apple Cookies?
Once the glaze has completely set, store the cookies in an airtight container. Because they contain fresh apples, I recommend enjoying them within a few days for the best flavor and texture.
HOW TO MAKE GLAZED APPLE COOKIES
Start by placing the raisins in a microwave-safe bowl and covering them with water. Microwave for 4–5 minutes, until the raisins are soft and plump. Drain them well and set aside.
In a separate bowl, combine the flour, baking soda, and salt.
Cream together the shortening and brown sugar, then mix in the beaten egg.
Gradually add half of the flour mixture. Blend in the milk followed by the remaining flour mixture.
Fold in the plumped raisins, chopped walnuts, and finely chopped apples.
Drop the cookie dough by teaspoonfuls onto ungreased baking sheets, leaving about 2 inches between each cookie.
Bake at 400°F for 9–10 minutes.
While the cookies are still warm, drizzle them with the homemade vanilla glaze.
TIPS & VARIATIONS
Keep them small. These are soft, cake-like cookies, so smaller cookies tend to hold together better.
Chop the apples finely. Small pieces of apple distribute throughout the dough and give you apple flavor in every bite.
Swap the nuts. Pecans can be used instead of walnuts.
Add some spice. A little cinnamon or apple pie spice would be a delicious addition if you want even more fall flavor.
Don't skip the glaze! Drizzling the glaze over the warm cookies gives them that extra touch of sweetness that makes them so good. PERFECT FOR SHARING
One of my favorite things about these cookies is how easy they are to share. Stack a few in a clear treat bag, tie it with a pretty fall ribbon, and you have an easy homemade gift for neighbors, teachers, friends, or family.
Or just keep them at home and enjoy one with a hot cup of coffee. I won't tell!
These Glazed Apple Cookies are a simple old-fashioned treat that deserves a spot on your fall baking list.
Sweet caramel, crisp apples, and apple cider come together in this easy Caramel Apple Sangria. It’s the perfect fall cocktail for Thanksgiving, Halloween parties, girls’ night, or any cozy autumn gathering!
AN EASY FALL SANGRIA RECIPE
If there are two flavors that just belong together in the fall, it has to be caramel and apple! This Caramel Apple Sangria combines those classic fall flavors into one delicious party drink.
Made with white wine, caramel-flavored vodka, apple cider, and plenty of fresh apples, this sangria tastes like fall in a glass. It has just the right combination of sweet apple flavor and rich caramel, and it couldn’t be easier to make.
One of the things I love most about sangria is how simple it is when you’re entertaining. Just mix everything together in a pitcher, add the apples, and you have a festive drink ready to share.
This is a great adult drink for Halloween parties, Thanksgiving, Friendsgiving, Christmas gatherings, or just kicking back on a crisp fall evening.
FREQUENTLY ASKED QUESTIONS
What kind of wine is best for Caramel Apple Sangria?
Chardonnay or Pinot Grigio both work wonderfully. If you prefer your sangria on the sweeter side, try using Moscato or Riesling.
What kind of apples should I use?
Use your favorite crisp apples. Honeycrisp, Gala, Fuji, or Pink Lady are all great choices. You could also add a Granny Smith apple for a little tartness to balance the sweetness.
Can I make Caramel Apple Sangria ahead of time?
Yes! In fact, giving the sangria a little time in the refrigerator allows the flavors of the apples, cider, wine, and caramel vodka to mingle. Prepare it a few hours before serving and keep it chilled.
Can I make this sangria bubbly?
Absolutely! Add a splash of ginger ale to each glass just before serving. You could also add ginger ale to the pitcher right before serving if you know the whole pitcher will be enjoyed.
Do I have to serve Caramel Apple Sangria over ice?
No. A fun trick is to freeze some of your chopped apples ahead of time. The frozen apples help keep the sangria cold without watering down your drink.
Can I use regular vodka instead of caramel vodka?
You can, but caramel-flavored vodka is what gives this sangria its signature caramel apple flavor. If you substitute plain vodka, the finished drink won't have quite the same caramel flavor.
INGREDIENTS NEEDED
(SEE FULL RECIPE IN RECIPE CARD BELOW)
750 ml bottle white wine – Chardonnay or Pinot Grigio
1 ½ cups caramel-flavored vodka
6 cups apple cider
5–6 medium apples, cored and chopped
HOW TO MAKE CARAMEL APPLE SANGRIA
In a large pitcher, combine the white wine, caramel-flavored vodka, and apple cider.
Core and chop 3–4 of the apples and add them to the pitcher.
Gently muddle the apples in the sangria to help release some of their fresh apple flavor.
Pour the sangria into glasses over ice and add additional chopped apples to each glass, if desired.
Serve and enjoy!
TIPS & VARIATIONS
Freeze the apples: Chop and freeze some of the apples ahead of time and use them in place of ice cubes. They'll keep your drink cold without diluting all that wonderful caramel apple flavor.
Make it sweeter: Use Moscato or Riesling instead of Chardonnay or Pinot Grigio.
Give it some fizz: Top each glass with a splash of ginger ale just before serving.
Dress up the glasses: Add fresh apple slices to each glass for a simple fall garnish.
Make it ahead: Mix the sangria a few hours before your party and refrigerate until you're ready to serve.
CRAVING MORE FALL DRINK RECIPES?
If you love this Caramel Apple Sangria, be sure to check out these other fall favorites:
Whether you're hosting a big fall party or enjoying a relaxing evening with friends, this easy Caramel Apple Sangria is a delicious way to toast the season. Cheers!
Yield: 6 - 8Author: Served Up With Love
Caramel Apple Sangria
Grab the girls and make some of this Caramel Apple Sangria to celebrate all things fall.
prep time: cook time: total time:
ingredients
750 ml bottle of white wine- Chardonnay or Pinot Grigio
1 ½ cups caramel flavored vodka
6 cups apple cider
5-6 medium apples, cored and chopped
instructions
In
a large pitcher, combine wine, vodka, and apple cider. Add 3-4 medium apples,
chopped and cored. Muddle the sangria a bit to infuse some of the fresh apple
flavor. Pour into a glass, over ice, and add additional chopped apples to each
glass, if desired.
NOTES:
Freeze those apple to skip the need for ice!
**post may contain affiliate links
Mummy Dogs
A spooky Halloween dinner that’s almost too cute to eat!
If you're looking for an easy Halloween dinner the kids will get excited about, these Mummy Dogs are just the thing! Hot dogs are wrapped in strips of crescent roll dough to look like little mummies and baked until golden brown. Add some candy eyes, and you have an adorable Halloween meal that's ready in less than 30 minutes.
I love recipes that make a holiday feel special without adding a bunch of extra work, and these Mummy Dogs definitely fit the bill. They're basically a fun Halloween version of pigs in a blanket, and you only need two main ingredients to make them!
Serve them before heading out for trick-or-treating, make them for a Halloween party, or just surprise the kids with a spooky dinner one night in October.
FREQUENTLY ASKED QUESTIONS
Can I use crescent roll dough instead of breadsticks? Absolutely! Crescent roll dough works perfectly. Unroll the dough, pinch the seams together to create one sheet, and then cut it into thin strips with a knife or pizza cutter.
How do you make the hot dogs look like mummies? Wrap thin strips of dough around each hot dog in different directions to resemble mummy bandages. Leave a small opening near the top of the hot dog for the mummy's face.
Do I have to add the candy eyes? No. The Mummy Dogs are still adorable without them. You can also use small dots of mustard or ketchup to make eyes.
Can I add cheese to Mummy Dogs? Yes! Add a small piece of cheese to the face area after baking and return the Mummy Dogs to the oven for about a minute to melt the cheese. Add the candy eyes immediately after removing them from the oven.
Can I make Mummy Dogs ahead of time? They're best served fresh from the oven, but you can prepare them a little ahead of time. Wrap the hot dogs in the dough, cover, and refrigerate until you're ready to bake.
What should I serve with Mummy Dogs? Keep the Halloween theme going and serve them with Witches Brew, Autumn Harvest Punch, Baked Chili Fries, or your favorite easy party snacks.
INGREDIENTS NEEDED
(SEE FULL RECIPE IN RECIPE CARD BELOW)
Crescent rolls or canned breadsticks
Hot dogs
Cheese slices, optional
Candy eyes, optional
How to Make Mummy Dogs
Heat oven to 375 degrees.
Unroll crescent roll and pinch together to form a sheet. (you can also find crescent rolls sheets.)
With a knife or pizza cutter, cut the crescent rolls into strips.
Wrap the crescent roll "bandages," around the hot dog stretching slightly to completely cover the hot dog. About 1/2 inch from one end of each hot dog, separate "bandages" so hot dog shows through for the "face."
Place mummy dogs on a large baking sheet sprayed with cooking spray. Bake 13 to 17 minutes or until dough is light golden brown.
Add a small piece of cheese onto the "face" of the mummy dog and place back in the oven for a minute to melt. Immediately remove and add candy eyes.
TIPS & VARIATIONS
Make them extra spooky: Wrap the dough strips in different directions and don't worry about making them perfect. Messy bandages make the mummies even cuter!
Add cheese: Wrap a thin strip of cheese around the hot dog before adding the crescent dough for cheesy Mummy Dogs.
Skip the candy eyes: Small dots of mustard or ketchup work great for making the mummy faces.
Serve with dipping sauces: Put out little bowls of ketchup, mustard, ranch, or your family's favorite dipping sauce.
Make mini mummies: Cut the hot dogs in half before wrapping them for bite-sized Halloween party food.
These easy Mummy Dogs are proof that you don't need anything complicated to make Halloween dinner fun. With just hot dogs and crescent roll dough, you can have a spooky meal on the table in less than 30 minutes!
They're perfect for Halloween parties, family movie nights, or a quick dinner before everyone heads out for trick-or-treating. Happy Halloween!
How to Make Mummy Dogshttps://www.youtube.com/watch?v=u9fAn2ZhMI4These Mummy Dogs are so easy to make and the kids love them. You're only 2 ingredients away from a super fun Halloween treat for your little ghosts and goblins.https://i9.ytimg.com/vi/u9fAn2ZhMI4/mq1.jpg?sqp=CPGhnO0F&rs=AOn4CLCTwIiVyoQhgvVS5U-HRbM5qAkH9Q08/19/2019
Yield: 10 - 12
Author: Served Up With Love
prep time: 10 Mcook time: 17 Mtotal time: 27 M
These super cute Mummy Dogs are a kid favorite for Halloween. Super easy recipe made with only 2 ingredients. Perfect for parties or for a fun Halloween dinner.
ingredients:
1 can of crescent rolls
10 - 12 hot dogs
instructions:
How to cook Mummy Dogs
Heat oven to 375 degrees F. Unroll crescent roll and pinch together to form a sheet. (you can also find crescent rolls sheets.) With a knife or pizza cutter, cut the crescent rolls into strips. Wrap the crescent roll "bandages," around the hot dog stretching slightly to completely cover the hot dog. About 1/2 inch from one end of each hot dog, separate "bandages" so hot dog shows through for the "face." Place mummy dogs on a large baking sheet sprayed with cooking spray. Bake 13 to 17 minutes or until dough is light golden brown.
NOTES:
Add a small piece of cheese onto the "face" of the mummy dog and place back in the oven for a minute to melt. Immediately remove and add candy eyes.
A fun and easy Halloween snack mix that’s sweet, salty, crunchy, and perfect for spooky season!
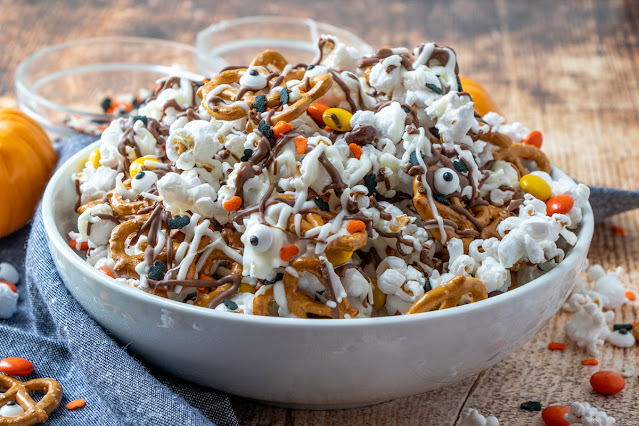
If you’re looking for an easy Halloween treat that kids and adults will love, this Monster Munch is just what you need! Popcorn and crunchy pretzels are mixed with colorful Reese’s Pieces, then drizzled with white and chocolate almond bark and topped with candy eyeballs and Halloween sprinkles.
It’s spooky, colorful, and so much fun to make!
Monster Munch is perfect for Halloween parties, classroom celebrations, fall get-togethers, or a spooky movie night at home. Best of all, it takes just a few minutes to put together.
I love recipes like this because there really aren’t any rules. You can add more candy, change up the sprinkles, or toss in whatever goodies you happen to have in the pantry. Just put it all together, let the chocolate set, and dig in!
AN EASY HALLOWEEN SNACK MIX
Halloween is always more fun when there are some spooky treats involved! This Monster Munch is one of those recipes that looks extra special but is incredibly easy to make.
You get a little bit of everything in every handful—the salty crunch of popcorn and pretzels, sweet candy, creamy chocolate, and plenty of festive Halloween sprinkles. And those little candy eyeballs peeking out make it even more fun!
Set out a big bowl at your Halloween party and watch how quickly it disappears.
FREQUENTLY ASKED QUESTIONS
What kind of popcorn should I use?
You can use freshly popped popcorn, microwave popcorn, or even a bag of already-popped popcorn from the grocery store. I prefer a lightly salted popcorn since there are plenty of sweet ingredients being added.
Can I use different candy?
Absolutely! That is one of the best things about this recipe. Swap the Reese’s Pieces for M&M’s, candy corn, mini peanut butter cups, or your favorite Halloween candy.
What can I use instead of almond bark?
You can use white and milk chocolate melting wafers or candy melts. Just make sure whatever you use melts smoothly enough to drizzle over the popcorn mixture.
Can I make Monster Munch ahead of time?
Yes! Make it a day or two before your party and store it in an airtight container once the chocolate has completely hardened.
How should I store Monster Munch?
Keep it in an airtight container at room temperature. Keeping the container tightly sealed will help the popcorn and pretzels stay crunchy.
Can I make this for other holidays?
Of course! Change the candy and sprinkles to match Christmas, Easter, birthdays, game day, or any other celebration. It also makes a fun movie-night snack any time of year.
INGREDIENTS NEEDED
(SEE FULL RECIPE IN RECIPE CARD BELOW)
Popped popcorn – The crunchy base for this easy snack mix.
Pretzel twists – Adds a salty crunch that balances all that sweetness.
Reese’s Pieces – Perfect Halloween colors and a little peanut butter goodness.
White almond bark – Melts easily and helps hold all those fun toppings in place.
Chocolate almond bark – Adds another delicious layer of chocolate.
Candy eyeballs – Gives our Monster Munch its spooky personality!
Halloween sprinkles – The finishing touch that makes this snack mix extra festive.
HOW TO MAKE MONSTER MUNCH
Line a baking sheet with wax paper.
Spread the popped popcorn onto the prepared baking sheet and mix in the pretzel twists and Reese’s Pieces.
Melt the white and chocolate almond bark separately according to the package directions. You only need about one or two squares of each.
Drizzle the melted almond bark all over the popcorn mixture.
Before the almond bark hardens, add the candy eyeballs and Halloween sprinkles. Use as much or as little as you like!
Allow everything to cool completely and harden. If you’re in a hurry, pop the baking sheet into the freezer for a few minutes to speed things along.
Once set, break the Monster Munch into pieces, place it in a big bowl, and dig in!
TIPS & VARIATIONS
Make sure your popcorn is completely cooled before adding the chocolate.
Add candy corn for even more Halloween color.
Toss in mini marshmallows, cookie pieces, or chocolate-covered pretzels.
Try different colors of candy melts to make it extra spooky.
Add potato chips for even more salty-sweet crunch.
Package individual portions in clear treat bags for an easy Halloween party favor.
Change the candy and sprinkle colors to make this snack mix for other holidays and celebrations.
PERFECT FOR HALLOWEEN PARTIES
If you’re planning a Halloween party, this Monster Munch definitely deserves a spot on the menu. It’s easy to make a big batch, looks adorable sitting on the snack table, and doesn’t require plates or forks.
You can even put it into individual treat bags for party favors or Halloween treats. Just be prepared—kids aren’t the only ones who will keep coming back for another handful!
Prep time: 5 MinCook time: 5 MinTotal time: 10 Min
An easy Halloween inspired snack mix made with popcorn, pretzels, candy pieces, sprinkles, and chocolate drizzle.
Ingredients
5 cups of popped popcorn
2 cups of pretzel twists
1/2 cup of Reese's Pieces
White almond bark
Chocolate almond bark
Candy eyeballs
Halloween sprinkles
Instructions
Line a baking sheet with wax paper. Mix in the pretzels and candy pieces. Melt almond bark according to package directions (separately). You won't need to use the entire block, just one or two squares each. Drizzle almond bark all over. Place the eyeballs and sprinkles into the almond bark before it hardens. Add as much or as little as you like. Allow to cool. You can place in the freezer to speed up the process. Break up and add to a big bowl and dig in.
Notes:
The perfect snack mix for parties such as Halloween, harvest, birthday, etc. Also, makes a great snack for movie night.









.png)


.jpg)


.png)
.jpg)


